Perform salesforce query using “in” Operator in Mulesoft

Case: When we want to query on a Salesforce object for multiple records at a time instead of using “=” for each record inside a loop, use “in” operator to get records in a single request.

Example:

Set Variable: sfdcQueryParam

%dw 2.0
output application/java
---
"(" ++ ((['PROD-A','PROD-B','PROD-C','PROD-D']) map ("'" ++ $ ++ "'") joinBy ",") ++ ")"


Salesforce Query using Connector:
<salesforce:query doc:name="Product2" doc:id="49a4875c-b477-4733-b528-8c19ed5dcb06" config-ref="Salesforce_Config">
			<salesforce:salesforce-query ><![CDATA[SELECT Id, ProductCode FROM Product2 WHERE ProductCode in :sfdcQueryParam]]></salesforce:salesforce-query>
			<salesforce:parameters ><![CDATA[#[output application/java
---
{
	"sfdcQueryParam" : vars.sfdcQueryParam
}]]]></salesforce:parameters>
</salesforce:query>

Mulesoft – Merge two arrays by Identifier in dataweave

Use Case: When we have two arrays in different mule variables (or one in payload and one in variable), merge two arrays into a single array. We can use below dataweave logic to merge by an identifier.

Input:
Payload:
{
    "orders": [
        {
            "id": 123,
            "customer": "c1"
        },
        {
            "id": 124,
            "customer": "c2"
        }
    ]
}

orderVar:
{
    "orders": [
        {
            "id": 123,
            "number": "xyz1"
        },
        {
            "id": 124,
            "number": "xyz2"
        }
    ]
}

Dataweave:
%dw 2.0
output application/json
---
"orders":payload.orders map (record,index) -> {
    (vars.orderVar.orders filter (record.id == $.id) map (record2,index2) -> {
        "id": record.id,
        "number": record2.number,
        "customer": record.customer
    })
}

Output:
{
  "orders": [
    {
      "id": 123,
      "number": "xyz1",
      "customer": "c1"
    },
    {
      "id": 124,
      "number": "xyz2",
      "customer": "c2"
    }
  ]
}

In few scenarios we might need to merge by index of both input and output. Example, for salesforce bulk update/creates the response will be in the same order of the request payload. Here we should use index as an identifier. Below is the sample code.

%dw 2.0
output application/json
---
"orders":payload.orders map (record,index) -> {
    (vars.orderVar.orders filter ($$ == index) map (record2,index2) -> {
        "id": record.id,
        "number": record2.number,
        "customer": record.customer
    })
}

Oracle HCM – Organization Hierarchy Extraction

Query:

This example is if the hierarchy is at 4 levels, add new columns if you have more levels by adjusting the distance value

SELECT
per_org_l1.name AS Level1_name,
per_org_l2.name AS Level2_name,
(SELECT per_org_l3.name
FROM per_org_tree_node_rf org_tree_l3,
hr_organization_units_f_tl per_org_l3,
fnd_languages fnd_lang_l3
WHERE 1=1
AND org_tree_l3.tree_structure_code = ‘PER_ORG_TREE_STRUCTURE’
AND org_tree_l3.tree_code = ‘XYZ HR Hierarchy’
AND org_tree_l3.distance = 2
AND org_tree_l3.pk1_value = org_tree.pk1_value
AND per_org_l3.language = fnd_lang_l3.language_code
AND trunc(sysdate) BETWEEN nvl(per_org_l3.effective_start_date, sysdate – 1) AND nvl(per_org_l3.effective_end_date, sysdate +
1)
AND per_org_l3.organization_id (+) = to_number(org_tree_l3.ancestor_pk1_value)
AND nvl(per_org_l3.language, ‘US’) = ‘US’) as Level3_name,
(SELECT per_org_l4.name
FROM per_org_tree_node_rf org_tree_l4,
hr_organization_units_f_tl per_org_l4,
fnd_languages fnd_lang_l4
WHERE 1=1
AND org_tree_l4.tree_structure_code = ‘PER_ORG_TREE_STRUCTURE’
AND org_tree_l4.tree_code = ‘XYZ HR Hierarchy’
AND org_tree_l4.distance = 3
AND org_tree_l4.pk1_value = org_tree.pk1_value
AND per_org_l4.language = fnd_lang_l4.language_code
AND trunc(sysdate) BETWEEN nvl(per_org_l4.effective_start_date, sysdate – 1) AND nvl(per_org_l4.effective_end_date, sysdate +
1)
AND per_org_l4.organization_id (+) = to_number(org_tree_l4.ancestor_pk1_value)
AND nvl(per_org_l4.language, ‘US’) = ‘US’) AS Level4_name
FROM
per_org_tree_node_rf org_tree,
hr_organization_units_f_tl per_org_l1,
fnd_languages fnd_lang,
hr_organization_units_f_tl per_org_l2,
fnd_languages fnd_lang_parent
WHERE
1 = 1
AND org_tree.tree_structure_code = ‘PER_ORG_TREE_STRUCTURE’
AND org_tree.tree_code = ‘XYZ HR Hierarchy’
AND org_tree.distance = 1
AND per_org_l1.language = fnd_lang.language_code
AND trunc(sysdate) BETWEEN per_org_l1.effective_start_date AND per_org_l1.effective_end_date
AND per_org_l1.organization_id = to_number(org_tree.pk1_value)
AND per_org_l1.language = ‘US’
AND per_org_l2.language = fnd_lang_parent.language_code
AND trunc(sysdate) BETWEEN nvl(per_org_l2.effective_start_date, sysdate – 1) AND nvl(per_org_l2.effective_end_date, sysdate +
1)
AND per_org_l2.organization_id (+) = to_number(org_tree.ancestor_pk1_value)
AND nvl(per_org_l2.language, ‘US’) = ‘US’

Stop E-imaMail notification using workspace preferences setup

Case: For the Human task activity, we can have notification setup defined. If the assigned notification has enabled at human task, some users do not want to receive these notifications but some users want to receive

Solution: We can acheive this funcatioanlity by enabling the notification preference at the user level for not to send.

Steps:

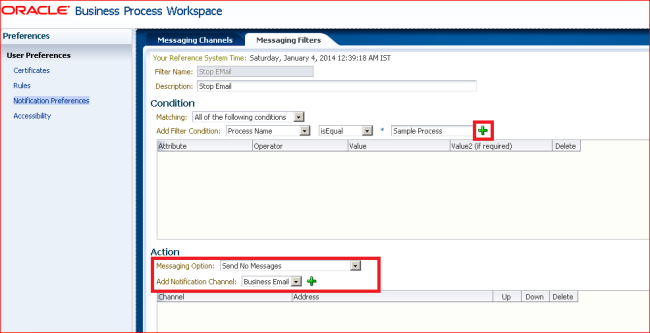
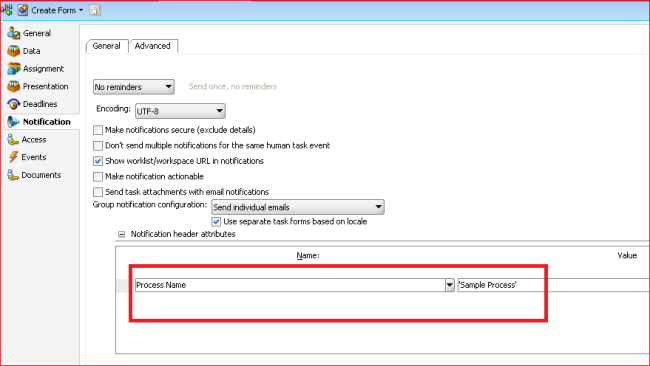
1. While defining the notification setup at the Human Task, also mentioned the notification attributes.

Notification tab -> Addvanced -> Header Attributes, define any of the attribute from the list.

Image


Setting preferences at user level:

1. Login to user and click on preferences

2. Move to notification preferences, you can observe one business email, as provided in myrelam.

3. Move to messaging filter tab, and click on Create to create a filter criteria.

4. Mention the condition by mentioning the process name attribute value and click on + to add the condition

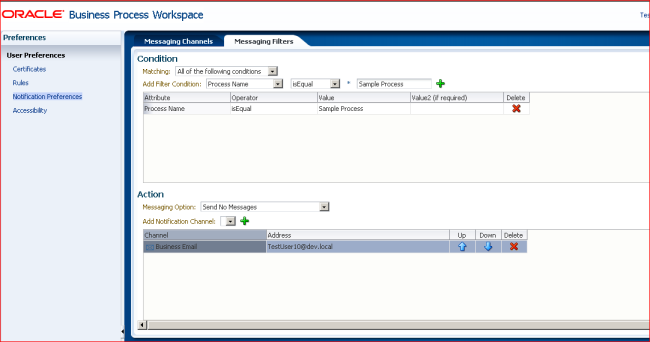
5. In the action secion select the “Send No Message” and “Business Email” and filnally click on +

Finally it will show as below.

Image


Image


6. Once the setup is done, deploy the application and test the scenario if you can able to stop this notification or not.


<Note>: you can also mention other messaging channel and send the messages to other chanels.

Default sorting on ADF table

We will have a requirement as when a page is getting loaded, the data ADF table should sort by some columns by default.

solution:

Add the below code to in the Iterator Binding of the page definition file.

<sortCriteria>

<sort attribute=”country” ascending=”true”/>

</sortCriteria>

Note: You can add multiple sort attributes inside the <sortCriteria>

Delete a Row in ADF table of EJB binding.

This is a general requirement for every updatable ADF table. We have couple of problems while deleting using ADF Delete data control.

Problem1: The ADF Delete binding always removes the first Row in a table.

Problem2: We have a Add button, when a new Row is added to a table, that might not be stored to database so the Delete should happen in two cases one for the newly added row and second for the Existing Row(row from the DB).

Solution: Write the below code to the delete action. (Note: adf table rowSelection will be single)

public String cbDelete_action() {

// Add event code here…

FacesContext ctx = FacesContext.getCurrentInstance();

ExpressionFactory ef = ctx.getApplication().getExpressionFactory();

// PlanDetails is the data controller for the table

ValueExpression ve =

ef.createValueExpression(ctx.getELContext(), “#{bindings.getPlanDetailsIterator.currentRow.dataProvider}”,

PlanDetailsView.class);

PlanDetailsView data =

(DetailsView)ve.getValue(ctx.getELContext());

//planTable is the binding value for the table and using this get the selected RowData

JUCtrlHierNodeBinding rowData =

(JUCtrlHierNodeBinding)planTable.getSelectedRowData();

// Removing the Row from the Model (ADF Table)

rowData.getRow().remove();

AdfFacesContext adfFacesContext = AdfFacesContext.getCurrentInstance();

// Refresh the ADF table

adfFacesContext.addPartialTarget(planTable);

try {

// Id is the unique id for the table, it will be populated when it got saved. If the ID is not null we need to remove from the DB. sessionMangaer.removeData is a method of the session bean which invokes the actual deletion of the Record.

if (data.getId() != null) {

sessionManager.removeData(data);

}

} catch (Exception e) {

logger.debug(“inside exception” + e.toString());

}

return null;

}
iCommand utility to Migrating (Import and Export) the BAM Active Directory Cache items

Migrating Data Objects and Reports using iCommand.

By iCommand we can migrate the BAM Active Direcotry Cache items.

Syntax :

For Windows OS:
iCommand -cmd <command_name> -username <username> -name <item_type> -type <type> -file <file_path>

For Unix OS:
./iCommand -cmd <command_name> -username <username> -name <item_type> -type <type> -file <file_path>
Export

Data Objects :

iCommand -cmd export -username testuser10 -name <DataObject_name> -type dataobject -file <filepath>

Folder
iCommand -cmd export -username testuser10 -name <folder_name> -type FOLDER -file <file_path>

Report
iCommand -cmd export -username testuser10 -name <folder_name> -type Report -file <file_path>
Import:
iCommand -cmd import -username testuser10 -file <file_path>

Update Existing Report
iCommand -cmd import -username testuser10 -file <file_path> -mode overwrite

Update existing Dataobject
iCommand -cmd import -username testuser10 -file <file_path> -mode update

For more details about the iCommand utility refer

http://docs.oracle.com/cd/E14571_01/integration.1111/e10224/bam_icommand.htm

Posted in OAF

Jdeveloper setups for OAF

Prerequisites for working with OAF 

  • To work with OAF we need to have the Jdev patch (OA Framework – How to find the correct version of JDeveloper to use with eBusiness Suite 11i or Release 12.x [ID 416708.1])
  • Extract the zip file in the local system. you will find jdevhome, jdevdoc and jdevbin (In jdevdoc you can get the help from index.html. you can find the OAF API, developers guide, personalization guide, Tutorial guide and etc..)
  • Need to have latest dbc file. You can get the dbc file from $FND_SECURE path
  • Place the dbc files in Jdevhome/jdev/dbc_files/secure path

Setup :

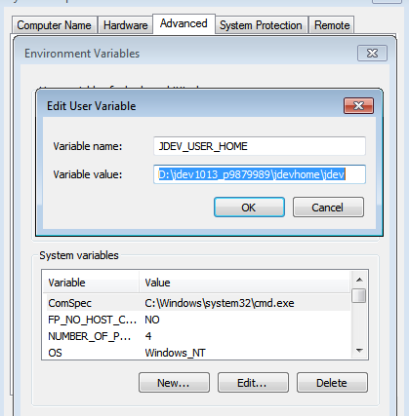
  1. Click on my computer properties -> Advanced Tab -> Environment Variables
  2. In the user variables Click on New
  3. Enter the variable name as JDEV_USER_HOME and variable value should be your jdev_extraction_folder/jdevhome/jdevImage
  4. Now go to Jdev_extration_dir/jdevbin/jdev/bin and click on jdevW.exe
  5. In the jdveloper click on open and select toolbox.jws from jdevhome/jdev/myprojects ( which is tutorial project)
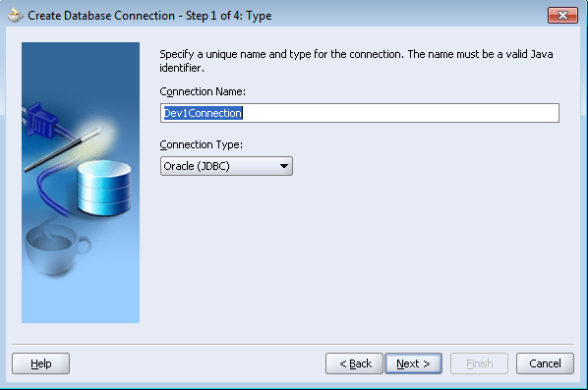
  6. Go to Connections tab then right click on database and select create a database connection
  7. Give the Connection name and click on nextImage
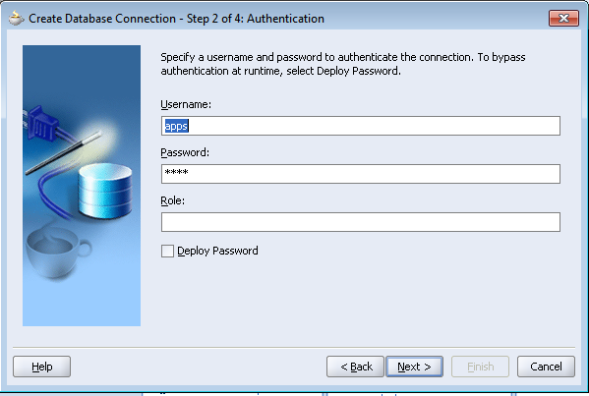
  8. give the user name as apps and give the apps schema password then click on nextImage
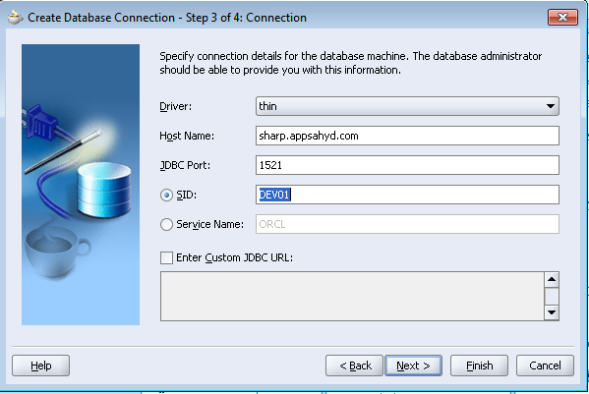
  9. Select the driver name as thin and give the host name, port and sid then click on nextImage
  10. In the next window test the connection
  11. In the Application Navigation expand toolbox, then select the Tutorial
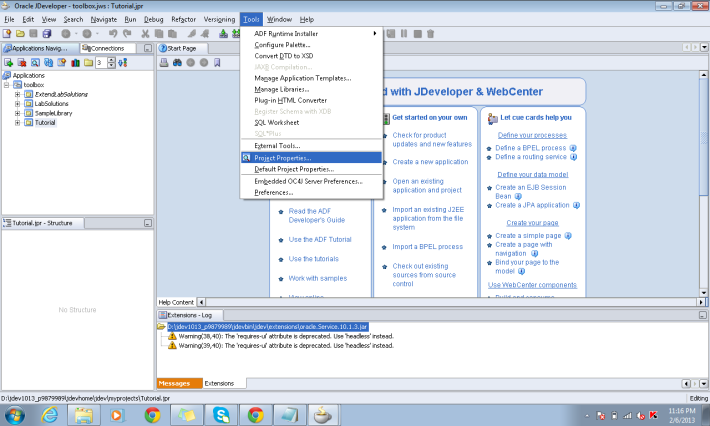
  12. Go to Tools-> Project PropertiesImage
  13. Expand Oracle Applications
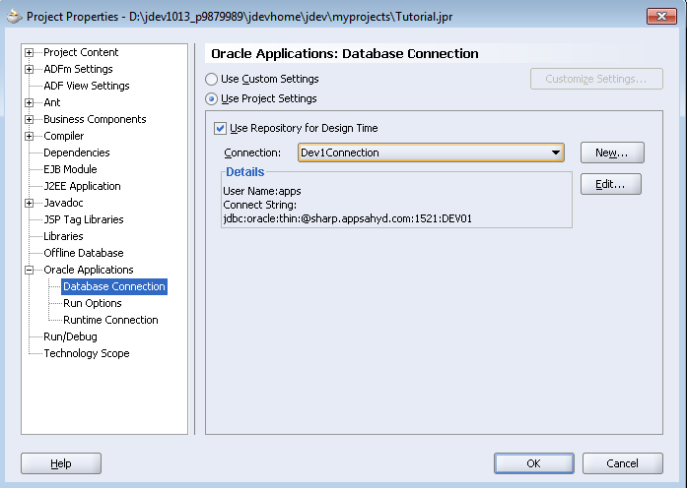
  14. Click on Database Connection then select the db connection created from connections tab by selecting the User Repository for design time (Note: you can create the db connection by clicking on New)Image
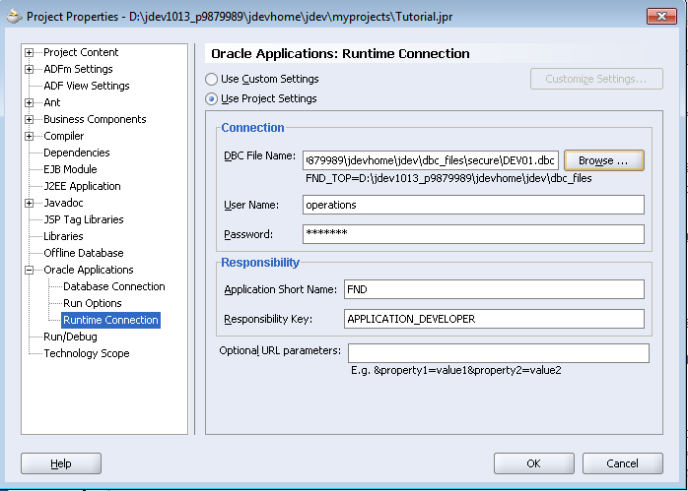
  15. Select Run Time Connections
  16. Select the DBC file then give the valid application user name and passowrd
  17. Give a Responsibility key name which is assigned to that user and application short name of the Responsibility.Image
  18. Finally click on OK.

Once you  follow all the above steps you are ready to working with OAF.

For testing you can run the HelloWorldPG.xml file, you can find the file by expanding Tutorial/ApplicationSources/oracle/apps/fnd/framework/toolbox/tutorial/webui.

Dynamically Changing the VO query in OAF

Generally while creating the View Objects we define a query to it. While rendering the OAF page these view objects get executed (either by framework or by the java code).

In some scenarios we might have a requirement to change the query of the VO, this query can be modified dynamically.

Example: Lets say a VO(EMPVO) has the query as
SELECT empno,ename,sal
FROM EMP

Now I want to change the query as below
SELECT empno,ename,sal+nvl(comm,0)
FROM EMP

Sample code:

String query = “SELECT empno,ename,sal+nvl(comm,0) FROM EMP”;
try
{
OAApplicationModule oam = oapagecontext.getApplicationModule(oawebbean);

// get the handle for your view object

EMPVOImpl voimpl = (EMPVOImpl)oam.findViewObject(“EMPVO”);   

voimpl.setFullSqlMode(voimpl.FULLSQL_MODE_AUGMENTATION);
voimpl.setQuery(query);

// setQuery only sets the new query to the View Object, in order to effect the changes of the query we need to execute the equery using below statement.

voimpl.executeQuery();
}
catch (Exception e)
{

}

Always need to call setFullSqlMode(voimpl.FULLSQL_MODE_AUGMENTATION) before executing the query, If you won’t call this OA Framework will not append the where clause and Order by clauses correctly.
The above code is written in controller, you can write the code in either processRequest method or in processFormRequest based on your requirement or in AM.

(Note: The number of columns and the order of the column data types must be same as the original query, so this code cann’t be used for adding new columns to the original query, for this we need to go for extension of VO)